Q: How do I access shared printers at the OSC?
Server controlled print queues:
A:
There are three general use network shared printers available at the OSC complex. All three network printers are controlled by the OSC servers. Once you login to your OSC computer account, you have access to these printing resources. The network printers are for general use by all faculty, staff and sutdents. The Xerox printer in the photocopy room is a multifunction device and should be the main printing facilty used. It is also the fastest and most versatile printing device at the OSC complex. On the xerox device a banner sheet will be printed with each print job to identify which one is yours. This is mandatory. You may place the banner sheet into one of the blue re-cycling boxes when you pick up your job. Please ensure that you retrieve your job promptly. Where possible, please use duplex printing to reduce paper waste. Please note the following exception in print handling: For personnel who are located in the 4 Clark Place building, your main printer (also a Xerox multifunction device) is designated "xrx-clark".
Windows printer access:
To access the server controlled print queues you must be using Microsoft Windows 2000 (tm) or better. Windows XP is preferred. Windows Vista is currently not tested. While Windows Vista may work there is no official support currently.
Installing OSCit Windows based print services:
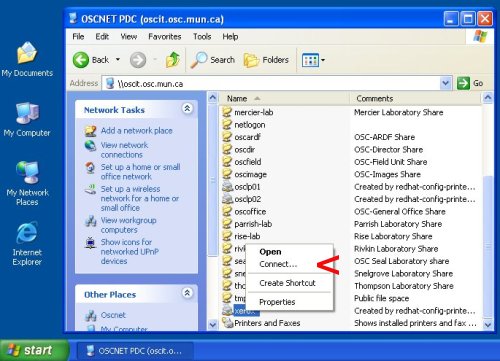
To access the OSC print queues, you must log into the OSCit server via one of the three approved methods (see FAQ: "Network and Server Accounts >> How do I log on to the server from my Microsoft Windows PC/Laptop?"). Once the server has validate your identity, you can view all the available print queues on oscit.osc.mun.ca by clicking on your "My Computer" icon on your desktop and entering the address "\oscit.osc.mun.ca". The primary printer designation is the Xerox multifunction device in the OSC main photocopy room designated under the label "xerox" as shown in the image below. Right click on the printer item in the oscit folder display named "xerox". Once the context connect menu appears, left click on the "connect" item therein. The correct printer settings will be automatically installed. Note: you must be a local windows PC administrator to do this, other wise an error will appear. If you have multiple logins on your PC, Windows will require you to perform this step once for all of your other login profiles. Repeat this same procedure for either the print queue termed "osclp01" or "osclp02" to attach to the HP printers in either of the graduate student labs. Choose the queue for the lab closest to you, but not both. An example is shown below.
Apple printer access:
For users of a current Apple OSX, all the print queues and drivers are immediately available when exploring the available network printers in the printer configuration tool. No special action is needed.
Linux printer access:
To be added.
Direct TCP/IP Printing:
Direct TCP/IP printing is not permitted for general use network printers except to print devices owned by faculty/laboratories where printing is limited to a specific research group or with explicit approval by OSCit.
Direct Web based printing to Xerox Multifunction Device:
It is possible to send a PDF only print job directly via the web (within the scope of the OSC network only) to the main Xerox multifunction printer. To do so, a user must direct their web browser to the following URL address: http://134.153.110.33
You will be ask to accept a security certificate; do so by clicking "ok" or "accept". Once you see the Xerox workcentre page displayed, click the "print" tab on top. Once there, you may choose any of the layout options or scroll to the bottom of the page directly and click on the file name open dialog button as in the example below.
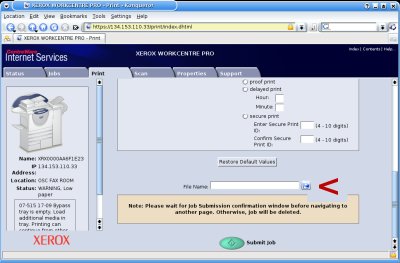
Choose the PDF file you wish to print. (This print option will ONLY support PDF printing). Click open. Your choice should now appear in the file name choice field as in he example below.
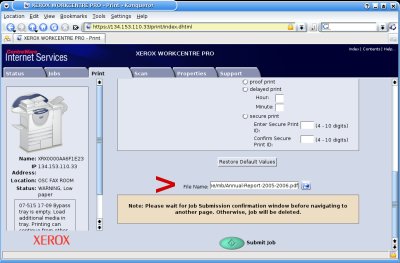
Now click ONCE on the large green "Submit Job" button immediately below. Do NOT navigate away from your page as this will delete your print job. Wait until the web page refreshes to confirm that your job has been finished or until the web page returns to the original print ready screen.